tags: [‘AST’]
sticky: ‘7’
注意:解混淆插件几乎不可能做到通用所有混淆,学习 ast 才能对混淆进行还原。
# path/types (node) 的常用方法介绍# 查看节点的源代码
path . toString ()
generator ( node ) . code ;
获取 path 与 node 的源代码方式。
1 2 3 4 5 6 7 8 9 10 11 12 13 14 15 16 17 18 19 20 21 22 23 const parser = require ("@babel/parser" );const traverse = require ("@babel/traverse" ).default ;const types = require ("@babel/types" );const generator = require ("@babel/generator" ).default ;let jsCode = `let a = "hi ast";` ;let ast = parser.parse (jsCode);traverse (ast, { VariableDeclarator (path) { console .log ("path.toString: " , path.toString ()); const { node } = path; console .log ("generator: " , generator (node).code ); }, }); let { code } = generator (ast, (opts = { jsescOption : { minimal : true } }));console .log (code);
# 判断节点类型
types.is VariableDeclarator (node,opts)
path.is VariableDeclarator (opts)
下方 "FunctionDeclaration|FunctionExpression" 这样写可同时遍历当前两种或多种类型。
判断节点是否是需要处理的节点,下面例子中常用到的姿势都有提到。
1
2
3
4
5
6
7
8
9
10
11
12
13
14
15
16
17
18
19
20
21
22
23
24
25
26
27
28
let jsCode = ` let a = ""; var b = 0; const c = 2; function d () { console.log('hi') } var e = function () { console.log('ok') } ` ;traverse (ast, { "FunctionDeclaration|FunctionExpression" (path) { if (path.isFunctionExpression ()) return ; console .log ("日志1:" , path.toString () + ";" ); }, VariableDeclaration (path) { if (path.isVariableDeclaration ({ kind : "let" })) return ; if (types.isVariableDeclaration (path.node , { kind : "var" })) return ; console .log ("日志2:" , path.toString ()); }, });
输出结果
1 2 3 4 5 日志2 : const c = 2 ; 日志1 : function d ( console .log ('hi' ); };
# 替换节点
path. replaceInline (nodes)
path. replaceWithMultiple ()
path. replaceWith ()
推荐使用 replacelnline 方法,它兼容其他两种方法,无脑使用 replacelnline 即可。
types.valueToNode 方法可以将基础值转换为对应节点。
下面这段插件可以将所有变量的值都变为 666。
1
2
3
4
5
6
7
8
9
10
11
12
let jsCode = ` var a = 1; var b = 2; var c = 3; ` ;let ast = parser.parse (jsCode);traverse (ast, { VariableDeclarator (path) { path.replaceInline (types.valueToNode (666 )); }, });
输出结果
1
2
3
var a = 666 ;var b = 666 ;var c = 666 ;
# 节点删除
path. remove()
该方法没有参数,可以将路径下的节点全部删除,使用请小心。
下面示例将变量名为 a 的 path 删除了,结果是删除了 var a = 1; 这行代码。
1
2
3
4
5
6
7
8
9
10
11
12
13
14
let jsCode = ` var a = 1; var b = 2; var c = 3; ` ;let ast = parser.parse (jsCode);traverse (ast, { VariableDeclarator (path) { let { id } = path.node ; if (id.name != "a" ) return ; path.remove (); }, });
输出结果
# 节点插入
path. insertBefore (nodes ) //当前节点前插入
path. insertAfter (nodes ) // 当前节点后插入
什么地方可以插入节点?
一般在 [] 节点类型进行插入,你可以使用 Array 的方法来操作它,比如 <font style="color:rgb(47, 48, 52);">pop</font> 、 <font style="color:rgb(47, 48, 52);">push</font> 等等。
1 2 3 4 5 6 7 8 9 10 11 12 13 14 15 16 17 18 19 20 21 22 23 24 25 let jsCode = `var b = 1;` ;traverse (ast, { VariableDeclarator (path) { if (path.node .id .name != "b" ) return ; let node = types.VariableDeclarator ( types.Identifier ("a" ), types.valueToNode (0 ) ); path.parent .declarations .unshift (node); let node1 = types.VariableDeclarator ( types.Identifier ("c" ), types.valueToNode (2 ) ); let node2 = types.VariableDeclarator ( types.Identifier ("d" ), types.valueToNode (3 ) ); path.insertAfter ([node1, node2]); }, });
输出结果
1 2 3 4 var a = 0, b = 1, c = 2, d = 3;
# 获取父节点
path.parent
path.parentPath
path.parentPath 获取的是 path,path.parent 获取的是 node,他们的关系如下:
1 path.parent = path.parentPath .node ;
# 获取子孙节点
path. get (key)
形参 key 是一个字符串,也就是路径,以。隔开。
两种方式获取子节点。
path. get 获取的是 <font style="color:rgb(47, 48, 52);">path</font> ,需要 <font style="color:rgb(47, 48, 52);">.node</font> 获取节点。
1 2 3 4 5 6 7 8 let jsCode = "var b = 1;" ;traverse (ast, { Program (path) { let node1 = path.get ("body.0.declarations.0" ).node ; let node2 = path.node .body [0 ].declarations [0 ]; console .log (node1 === node2); }, });
# 获取兄弟节点
path.getPrevSibling () // 获取前一个兄弟节点
path. getAllPrevSiblings () // 获取所有的前兄弟节点
path.getNextSibling () // 获取后一个兄弟节点
path.getAllNextSiblings () // 获取所有的后兄弟节点
获取的为 path,其中 getAllPrevSiblings,getAllNextSiblings 返回 path 列表。
1 2 3 4 5 6 7 8 9 10 11 12 13 14 15 16 let jsCode = ` var a = "老大",b= "老二", c ="老三",d="老四",e="老五"; ` ;traverse (ast, { VariableDeclarator (path) { if (path.node .id .name != "c" ) return ; console .log ("获取前一个兄弟节点" , path.getPrevSibling ().toString ()); console .log ("获取所有的前兄弟节点" , path.getAllPrevSiblings ().toString ()); console .log ("当前节点是" , path.toString ()); console .log ("获取后一个兄弟节点" , path.getNextSibling ().toString ()); console .log ("获取所有的后兄弟节点" , path.getAllNextSiblings ().toString ()); }, });
输出结果
1 2 3 4 5 获取前一个兄弟节点 b = "老二" 获取所有的前兄弟节点 b = "老二" ,a = "老大" 当前节点是 c = "老三" 获取后一个兄弟节点 d = "老四" 获取所有的后兄弟节点 d = "老四" ,e = "老五"
# 向上查找节点
path.findParent (callback) // 从父节点查找
path. find (callback) // 从当前节点查找
find ( findParent 从父节点 ) 从当前 path 开始向上遍历,直到满足回调函数条件为止,找不到则返回 <font style="color:rgb(47, 48, 52);">null</font> 。
1 2 3 4 5 6 7 8 9 10 11 12 13 14 15 16 17 18 19 20 21 22 23 24 25 26 27 let jsCode = ` function a() { function b() { function c() { } } } ` ;traverse (ast, { FunctionDeclaration (path) { const { id } = path.node ; if (id.name !== "c" ) return ; let find = path.find ((p ) => p.isFunctionDeclaration ()); let findParent = path.findParent ((p ) => p.isFunctionDeclaration ()); let findParent1 = path.findParent ( (p ) => p.isFunctionDeclaration () && p.node .id .name == "a" ); let findParent2 = path.findParent ( (p ) => p.isFunctionDeclaration () && p.node .id .name == "c" ); console .log ("find -> " , find.toString ()); console .log ("findParent -> " , findParent.toString ()); console .log ("findParent1 -> " , findParent1.toString ()); console .log ("findParent2 -> " , findParent2); }, });
输出结果
1 2 3 4 5 6 7 8 9 10 find -> function c ( findParent -> function b ( function c ( } findParent1 -> function a ( function b ( function c ( } } findParent2 -> null
# 计算表达式的值
path.evaluate ()
通过 evaluate 可以直接帮你把结果计算出来。
1 2 3 4 5 6 7 8 9 10 let jsCode = `var a = 1+2; var b = !![];` ;traverse (ast, { VariableDeclarator (path) { let initPath = path.get ("init" ); const { confident, value } = initPath.evaluate (); if (!confident) return ; initPath.replaceWith (types.valueToNode (value)); }, });
输出结果
1 2 var a = 3 ;var b = true ;
# scope&binding 的用法介绍
资料来源 -> 作用域 Scope - 与 - 被绑定量 Binding
# 作用域 Scope<font style="color:rgb(232, 62, 140);">@Babel</font> 解析出来的语法树节点对象会包含作用域信息,这个信息会作为节点 <font style="color:rgb(232, 62, 140);">Node</font> 对象的一个属性保存 这个属性本身是一个 <font style="color:rgb(232, 62, 140);">Scope</font> 对象,其定义位于 <font style="color:rgb(232, 62, 140);">node_modules/@babel/traverse/lib/scope/index.js</font> 中
例:查看基本的 作用域与绑定 信息
1 2 3 4 5 6 7 8 9 10 11 12 13 14 15 16 17 18 19 20 21 22 23 const parser = require ("@babel/parser" );const traverse = require ("@babel/traverse" ).default ;const jscode = ` function squire(i){ return i * i * i; } function i() { var i = 123; i += 2; return 123; } ` ;let ast = parser.parse (jscode);const visitor = { FunctionDeclaration (path) { console .log ("\n\n这里是函数 " , path.node .id .name + "()" ); path.scope .dump (); }, }; traverse (ast, visitor);
执行 <font style="color:rgb(232, 62, 140);">Scope.dump()</font> ,会得到自底向上的 作用域与变量信息 得到结果:
1 2 3 4 5 6 7 8 9 10 11 12 13 14 15 16 17 这里是函数 squire() ------------------------------------------------------------ # FunctionDeclaration - i { constant: true, references: 3, violations: 0, kind: 'param' } # Program - squire { constant: true, references: 0, violations: 0, kind: 'hoisted' } - i { constant: true, references: 0, violations: 0, kind: 'hoisted' } ------------------------------------------------------------ 这里是函数 i() ------------------------------------------------------------ # FunctionDeclaration - i { constant: false, references: 0, violations: 1, kind: 'var' } # Program - squire { constant: true, references: 0, violations: 0, kind: 'hoisted' } - i { constant: true, references: 0, violations: 0, kind: 'hoisted' } ------------------------------------------------------------
输出查看方法
每一个作用域都以 # 标识输出 每一个绑定都以 - 标识输出 对于单次输出,都是自底向上的 先输出当前作用域,再输出父级作用域,再输出父级的父级作用域…… 对于单个绑定 Binding ,会输出 4 种信息
constant 声明后,是否会被修改 references 被引用次数 violations 被重新定义的次数 kind 函数声明类型。param 参数,hoisted 提升,var 变量, local 内部
后续会单独说明 Binding 对象,此处留个印象即可
描述 此处从两个函数节点输出了其作用域的信息
这两个函数都是定义在同一级下的,所以都会输出相同的父级作用域 Program 的信息 你会发现,代码中有非常多个 i ,有的是函数定义,有的是参数,有的是变量。仔细观察它们的不同之处 解释器就是通过 不同层级的作用域 与 绑定定义信息 来区分不同的名称的量的
# 绑定 Binding<font style="color:rgb(232, 62, 140);">Binding</font> 对象用于存储 绑定 的信息 这个对象会作为 <font style="color:rgb(232, 62, 140);">Scope</font> 对象的一个属性存在 同一个作用域可以包含多个 Binding
你可以在 <font style="color:rgb(232, 62, 140);">@babel/traverse/lib/scope/binding.js</font><font style="color:rgb(44, 62, 80);"></font> 中查看到它的定义
显示 Binding 的信息
1 2 3 4 5 6 7 8 9 10 11 12 13 14 15 16 17 18 19 20 21 22 23 24 25 26 27 28 29 30 31 32 33 34 35 36 37 38 39 const parser = require ("@babel/parser" );const traverse = require ("@babel/traverse" ).default ;const jscode = ` function a(){ var a = 1; a = a + 1; return a; } function b(){ var b = 1; var c = 2; b = b - c; return b; } ` ;let ast = parser.parse (jscode);const visitor = { BlockStatement (path) { console .log ("\n此块节点源码:\n" , path.toString ()); console .log ("----------------------------------------" ); var bindings = path.scope .bindings ; console .log ("作用域内 被绑定量 数量:" , Object .keys (bindings).length ); for (var binding_ in bindings) { console .log ("名字:" , binding_); binding_ = bindings[binding_]; console .log ("类型:" , binding_.kind ); console .log ("定义:" , binding_.identifier ); console .log ("是否会被修改:" , binding_.constant ); console .log ("被修改信息信息记录" , binding_.constantViolations ); console .log ("是否会被引用:" , binding_.referenced ); console .log ("被引用次数" , binding_.references ); console .log ("被引用信息NodePath记录" , binding_.referencePaths ); } }, }; traverse (ast, visitor);
会输出一大堆信息。其对应的意义已经写在代码中,可以自行查看
# 作用在解混淆中,作用域与绑定 主要用来处理边界的问题 即:某个量哪里引用了,在哪里定义
例:删除所有定义了,却从未使用的变量
1 2 3 4 5 6 7 8 9 10 11 12 13 14 15 16 17 18 19 20 21 22 23 24 25 26 27 28 29 30 const parser = require ("@babel/parser" );const traverse = require ("@babel/traverse" ).default ;const generator = require ("@babel/generator" ).default ;const jscode = ` var a = 1; var b = 2; function squire(){ var c = 3; var d = 4; return a * d; var e = 5; } var f = 6; ` ;let ast = parser.parse (jscode);const visitor = { VariableDeclarator (path) { const func_name = path.node .id .name ; const binding = path.scope .getBinding (func_name); if (binding && !binding.referenced ) { path.remove (); } }, }; traverse (ast, visitor);console .log (generator (ast)["code" ]);
得到输出:
1 2 3 4 5 6 var a = 1 ;function squire ( var d = 4 ; return a * d; }
这里使用了 Scope.getBinding() 方法来获取 Binding 对象,判断其引用情况来对语法树进行修改
# 构建节点# 不推荐的方式(需要了解)AST 在 js 看来就是一个 json 数据,说明可以构建 {} 的方式构建节点。
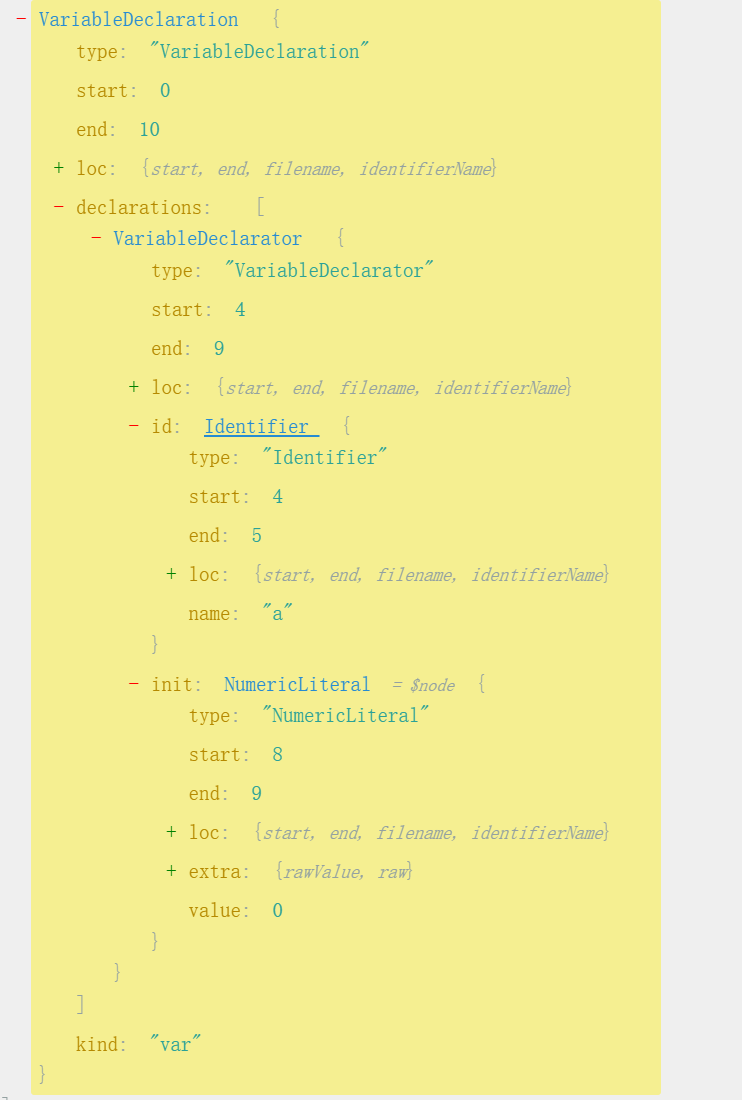
假设我们需要构造这段代码 var a = 0;
先使用 ASTexplorer 查看该代码的 AST。
js 源代码 var a = 0; 的 JSON 数据
1 2 3 4 5 6 7 8 9 10 11 12 13 14 15 16 17 18 19 20 21 22 23 24 25 26 { "type" : "VariableDeclaration" , "start" : 0 , "end" : 10 , "declarations" : [ { "type" : "VariableDeclarator" , "start" : 4 , "end" : 9 , "id" : { "type" : "Identifier" , "start" : 4 , "end" : 5 , "name" : "a" }, "init" : { "type" : "NumericLiteral" , "start" : 8 , "end" : 9 , "value" : 0 , "raw" : "0" } } ], "kind" : "var" }
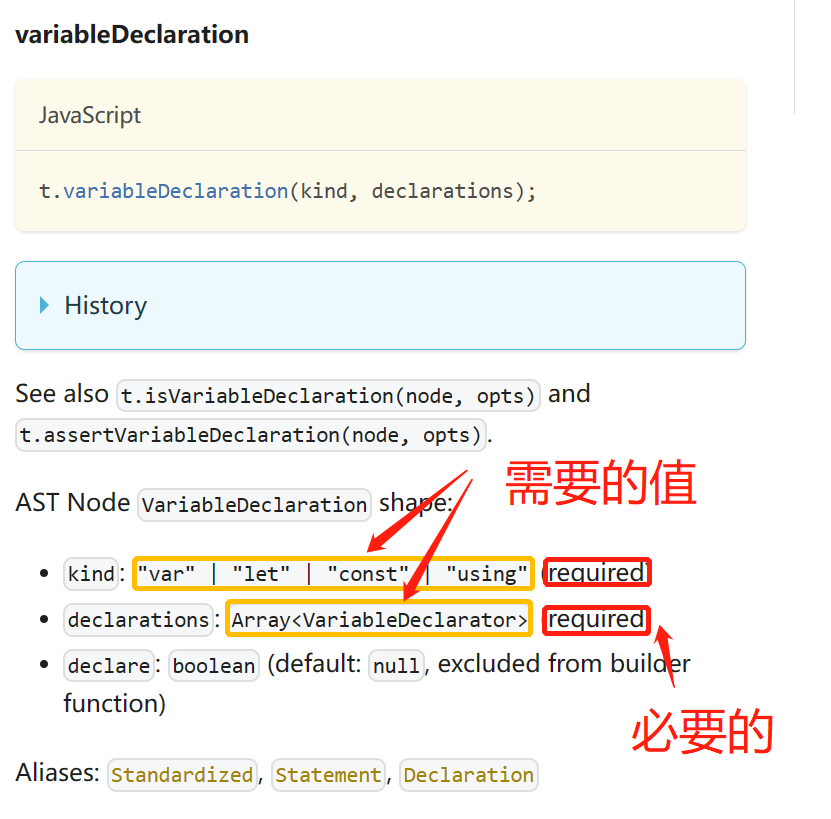
敏锐的你发现每个节点都有 start 、 end 、 type 这几个属性和其余不同的属性,这些都是必要的吗?哪些是必要的。这时需要参考 https://babeljs.io/docs/babel-types 查看哪些是必要节点。
以 VariableDeclaration 为例。
可以看到 VariableDeclaration 类型的节点有两个必要的节点( <font style="color:#DF2A3F;">type</font> 对于任何节点都是必须的) ,其中 kind 的类型为 string 值为黄色框框 框住的,而 declarations 的类型则为 VariableDeclarator 数组。
再参照其他类型节点的必要参数,简化得到下面的 ast 节点。
1 2 3 4 5 6 7 8 9 10 11 12 13 14 15 16 17 18 const astNode = { type : "VariableDeclaration" , declarations : [ { type : "VariableDeclarator" , id : { type : "Identifier" , name : "a" , }, init : { type : "NumericLiteral" , value : 0 , }, }, ], kind : "var" , }; console .log (generator (astNode).code );
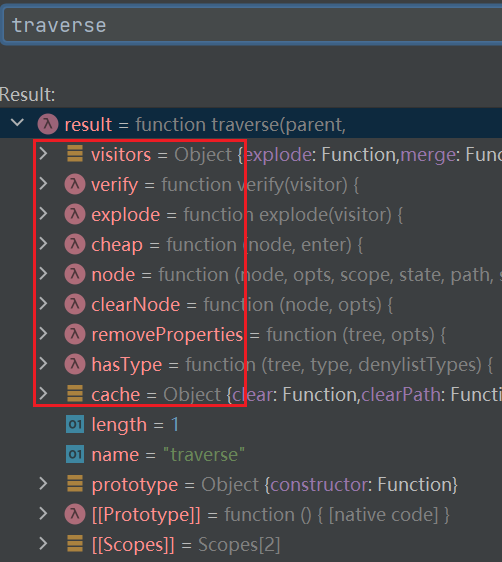
# types 函数构造节点手搓 ast 节点虽然不难,但是复杂的节点构建起来很冗余, types 提供了构建 node 的 function ,使用它们来构造简洁高效。如图构造函数的参数及顺序。
1 2 3 4 const astNode = types.variableDeclaration ("var" , [ types.variableDeclarator (types.identifier ("a" ), types.numericLiteral (0 )), ]); console .log (generator (astNode).code );
# template 快速构造节点(推荐) 使用 types.xxx 来构建节点虽然简洁了不少,但还是觉着繁琐。那么使用 <font style="color:rgb(47, 48, 52);">template</font> 绝对会让你眼前一亮。
假设需要构建 var a = 0,b = 1,c = 2; 使用手搓或 types.xxx 都很繁琐,那么试试新姿势吧!别忘了导包哦!
1 2 const template = require ("@babel/template" ).default ;let VAR_NODE = template (`var A = 0,B = 1, C = 2` );
这里定义了 <font style="color:rgb(47, 48, 52);">VAR_NODE</font> 变量,其中 <font style="color:rgb(47, 48, 52);">A</font> , <font style="color:rgb(47, 48, 52);">B</font> , <font style="color:rgb(47, 48, 52);">C</font> 类似于占位符 <font style="color:rgb(47, 48, 52);">VAR_NODE</font> 接收一个参数 <font style="color:rgb(47, 48, 52);">{}</font> , <font style="color:rgb(47, 48, 52);">{}</font> 的 <font style="color:rgb(47, 48, 52);">A</font> , <font style="color:rgb(47, 48, 52);">B</font> , <font style="color:rgb(47, 48, 52);">C</font> 这几个属性需要分别构造, <font style="color:rgb(47, 48, 52);">A</font> , <font style="color:rgb(47, 48, 52);">B</font> , <font style="color:rgb(47, 48, 52);">C</font> 等价于 VariableDeclarator 节点的 id 属性,也就是 identifier 节点,直接字符串也可以(标识符类型 )。
1 2 3 4 5 6 const astNode = VAR_NODE ({ A : "a" , B : "b" , C : "c" , }); console .log (generator (astNode).code );
得到输出:
1 2 3 var a = 0 , b = 1 , c = 2 ;
# 特性介绍# 同时遍历多个类型假设需要同时遍历多个类型,可以这样写插件,这样写一个方法处理两种类型的节点。
1 2 3 4 5 6 7 8 9 10 11 12 13 let jsCode = ` let a = ""; let b = 0; function d () { console.log('hi') } ` ;let ast = parser.parse (jsCode);traverse (ast, { "FunctionDeclaration|VariableDeclaration" (path) { console .log (path.toString ()); }, });
还可以这样写单独处理各自的类型的节点。
1 2 3 4 5 6 7 8 traverse (ast, { FunctionDeclaration (path) { console .log (path.toString () + ";" ); }, VariableDeclaration (path) { console .log (path.toString ()); }, });
# path.traverse
注意: path.traverse !== traverse
在 path.traverse 方法中, state 参数是一个对象,用于在遍历过程中保存和传递状态信息。你可以在访问器函数中使用 state 对象来存储和更新任何你需要的信息。
state 对象在遍历开始时由 path.traverse 方法创建并传递给每个访问器函数。你可以在访问器函数中修改 state 对象,以跟踪遍历过程中的状态。这些修改将在遍历过程中保留下来,并且在访问器函数之间共享。
以下是一个示例,展示了如何在 path.traverse 中使用 state 对象:
1 2 3 4 5 6 7 8 9 10 11 12 13 14 15 16 17 18 19 20 21 22 23 24 25 26 27 28 29 const traverse = require ("@babel/traverse" ).default ;const parser = require ("@babel/parser" );let code = ` function a() { function b() { function c() { } } } ` ;let ast = parser.parse (code);let state = { counter : 0 };const visitors = { BlockStatement : { enter (path, state ) { state.counter ++; }, exit (path, state ) { console .log ("遍历了" , state.counter , "个节点" ); }, }, }; traverse (ast, { BlockStatement (path) { path.traverse (visitors, state); }, });
在上面的示例中,我们创建了一个包含 counter 属性的 state 对象,并在 enter 和 exit 访问器中使用它来跟踪遍历的节点数量。在遍历开始时,我们将 state 对象作为第三个参数传递给 path.traverse 方法。然后,在每个访问器函数中,我们都可以使用和修改 state 对象。在 enter 访问器中,我们增加了 counter 的值;在 exit 访问器中,我们打印了遍历的节点数量。
通过使用 state 对象,你可以在遍历过程中跟踪和存储任何你需要的信息,并在访问器函数中进行相应的操作。
注意 traverse 并没有 state 参数
# babel/generatorbabel/generator 的 options 参数包括以下几种:
filename : 字符串,指定正在生成的文件的路径。sourceMap : 可选,是一个布尔值,指示是否生成 source map。sourceMapName : 可选,是一个字符串或函数,指定生成的 source map 的名称。sourceFileName : 可选,是一个字符串或函数,指定源文件的名称。sourceRoot : 可选,是一个字符串或函数,指定源文件的根目录。moduleRoot : 可选,是一个字符串或函数,指定模块的根目录。moduleId : 可选,是一个字符串或函数,指定生成的模块的 ID。looseModules : 可选,是一个布尔值,指示是否使用 loose 模块模式。esModules : 可选,是一个布尔值,指示是否使用 ES6 模块。sourceType : 可选,是一个字符串或函数,指定源代码的类型(例如 “script” 或 “module”)。requires : 可选,是一个数组,包含需要生成的 require 语句。plugins : 可选,是一个数组,包含要应用的插件。retainLines : 可选,是一个布尔值,指示是否保留行号。comments : 可选,是一个布尔值或函数,指示是否保留注释。compact : 可选,“auto” 或 “true” 表示启用压缩;“false” 表示禁用压缩;“true” 表示在压缩时忽略一些不必要的空白符;“紊” 表示在压缩时保留所有空白符。minified : 可选,是一个布尔值,指示是否启用最小化。uglify : 可选,是一个布尔值或对象,指示是否启用 UglifyJS 风格的压缩。beautify: true 可选,启用美化输出。asciiOnly : 可选,一个布尔值,指示是否将 Unicode 字符转换为 ASCII 字符。quoteKeys : 可选,一个布尔值,指示是否在对象字面量中保留键名。


